
Editing videos like a pro is easier than you think. With Davinci Resolve, you can achieve professional results.
Davinci Resolve is a powerful video editing tool used by filmmakers and content creators. It offers a range of features that can turn your raw footage into a polished video. Whether you are new to video editing or looking to enhance your skills, Davinci Resolve provides everything you need.
This software is user-friendly and packed with advanced tools. With a bit of practice, you can create stunning videos. In this blog post, we will explore how to edit videos like a pro using Davinci Resolve. You will learn essential tips and techniques to make your videos stand out. Get ready to elevate your video editing game!
Introduction To Davinci Resolve
Editing videos can seem daunting, but with the right tools, anyone can do it. One of the best tools for video editing is Davinci Resolve. This software offers a range of features that make editing easier and more professional. Let’s dive into an introduction to Davinci Resolve.
Features Overview
Davinci Resolve is packed with features. It combines editing, color correction, visual effects, motion graphics, and audio post-production all in one tool. This means you don’t need multiple software to create a polished video. Its interface is user-friendly and supports drag-and-drop functionality. The color grading tools are some of the best in the industry. You can fine-tune your video’s colors to perfection. The software also offers a variety of effects and transitions. These can make your videos more engaging. Davinci Resolve supports 8K editing and high frame rates. This ensures your video quality remains top-notch.
System Requirements
Davinci Resolve requires a powerful computer to run smoothly. For Windows users, you need Windows 10 or later. Your system should have at least 16GB of RAM. A higher RAM is better for larger projects. The software also needs a fast processor. An Intel Core i7 or AMD Ryzen 7 is recommended. You will need a dedicated GPU for rendering. NVIDIA or AMD GPUs with at least 4GB of VRAM are ideal. For macOS users, you need macOS 10.14.6 or later. Similar RAM and GPU requirements apply. Make sure your storage is sufficient. Video files can be large, so having enough space is important.
Setting Up Your Workspace
Setting up your workspace in Davinci Resolve is crucial for efficient video editing. A well-organized workspace can help you navigate through the software easily. It ensures that you have quick access to the tools you need. Let’s explore how to set up your workspace effectively.
Customizing The Interface
Davinci Resolve allows you to customize the interface to your liking. You can adjust the layout to fit your editing style. To start, go to the top menu and select “Workspace”. Then choose “Reset UI Layout” to see the default setup. From there, you can drag and drop panels.
Need more space for your timeline? You can resize the panels. Click and drag the edges of the panels to make them bigger or smaller. You can also hide panels you don’t use often. This helps in decluttering your workspace.
Another useful feature is the ability to save your custom layout. After arranging the panels, go to “Workspace” and select “Save Layout As”. This allows you to load your preferred layout anytime. Customizing the interface to your needs can make your editing process smoother.
Optimizing Performance
Optimizing performance in Davinci Resolve can save you time. Start by adjusting the playback settings. Go to the “Playback” menu and choose “Proxy Mode”. You can select “Quarter Resolution” for faster playback. This will make your edits more responsive.
Check your hardware settings. Go to “Preferences” under the “Davinci Resolve” menu. Make sure your GPU is set to “Auto”. This setting uses your graphics card to its full potential. It helps in rendering faster and smoother playback.
Finally, clear your cache regularly. Go to “Playback” and select “Delete Render Cache”. This frees up space and can improve performance. An optimized workspace means fewer lags and a more efficient editing process.
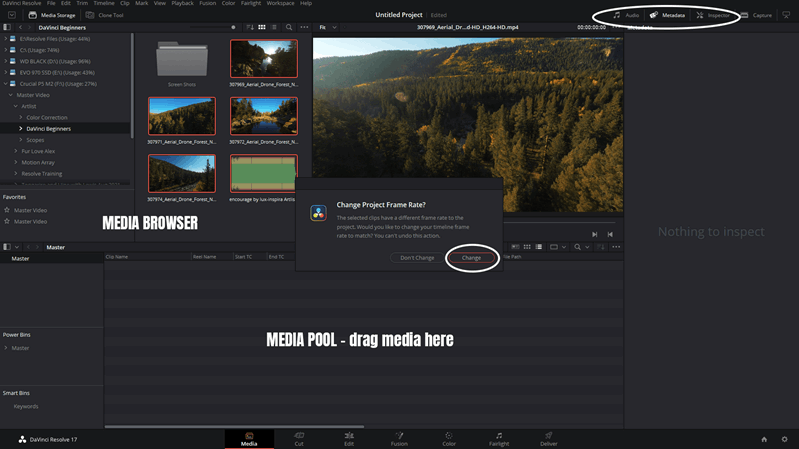
Importing Media
Editing videos like a pro starts with importing media into Davinci Resolve. This step sets the foundation for your project. Ensuring you correctly import and organize your files will save time and reduce frustration.
File Formats Supported
Davinci Resolve supports various file formats. Knowing which formats work is essential. Below are some common formats:
- Video: MP4, MOV, AVI
- Audio: WAV, MP3, AAC
- Images: JPG, PNG, TIFF
Using these formats ensures smooth playback and editing. Always check your file formats before importing.
Organizing Your Media Pool
Keeping your media pool organized is crucial. An organized workspace boosts efficiency and makes editing easier. Here are some tips:
- Create Folders: Group similar files into folders, such as “Videos”, “Audio”, and “Images”.
- Label Files: Use clear and descriptive file names. Avoid using generic names like “clip1” or “clip2”.
- Use Bins: Davinci Resolve allows you to create bins within the media pool. Bins function like folders, helping you categorize your files further.
Here’s a simple example of an organized media pool:
| Folder/Bin | File Type | Example Files |
|---|---|---|
| Videos | MP4, MOV | interview.mp4, b-roll.mov |
| Audio | WAV, MP3 | background.wav, voiceover.mp3 |
| Images | JPG, PNG | logo.png, screenshot.jpg |
Organizing your media pool this way keeps your project neat. You can find the files you need quickly and easily.

Credit: www.youtube.com
Basic Editing Techniques
Learning basic editing techniques is crucial to creating polished videos. With Davinci Resolve, you can quickly master the essentials. This section covers cutting and trimming and using the timeline to enhance your video editing skills.
Cutting And Trimming
Cutting and trimming are foundational in video editing. To start, load your clips into the media pool. Next, drag your clips to the timeline. Use the blade tool to cut your video at specific points. Simply click on the clip where you want to make the cut.
Trimming allows you to remove unwanted parts of a clip. Select the clip on the timeline. Drag the edges to trim the beginning or end. You can also use the trim tool for more precise adjustments. Press T on your keyboard to activate the trim tool.
Here’s a quick reference:
| Action | Tool | Shortcut |
|---|---|---|
| Cut | Blade Tool | B |
| Trim | Trim Tool | T |
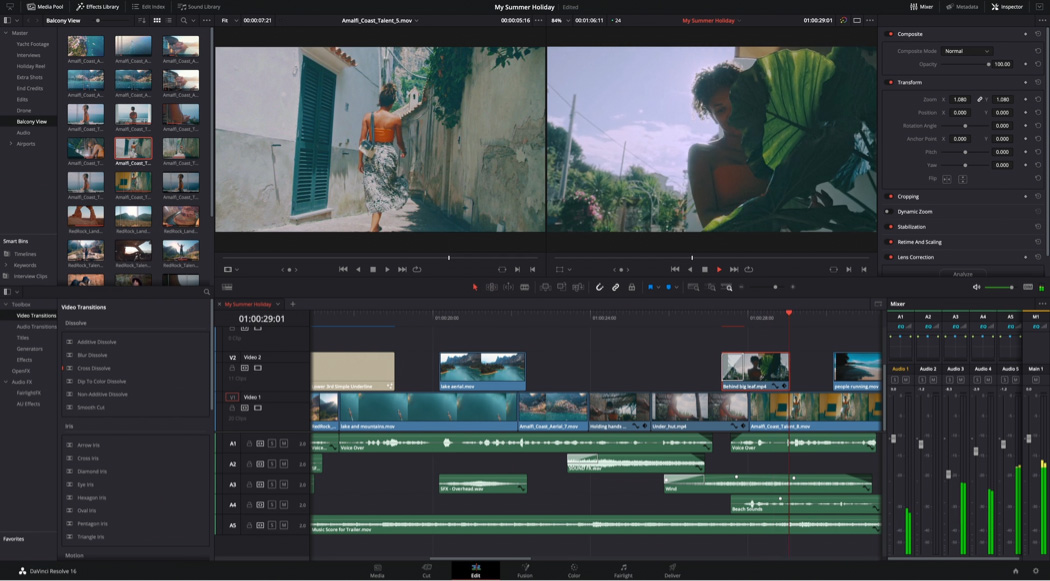
Using The Timeline
The timeline is where all the magic happens. It allows you to arrange your clips, add transitions, and sync audio. Start by dragging your clips from the media pool to the timeline. The timeline consists of multiple tracks for video and audio.
To rearrange clips, click and drag them to your desired position. Use the zoom tool to get a closer look at your timeline. Press Ctrl and + to zoom in and Ctrl and - to zoom out.
Adding transitions is also straightforward. Go to the Effects Library, select Video Transitions, and drag your chosen transition to the timeline. Place the transition between two clips for a smooth change from one to the next.
Here’s a quick reference:
- Zoom In:
Ctrl + - Zoom Out:
Ctrl - - Add Transition: Drag from Effects Library
Advanced Editing Tools
Davinci Resolve offers a range of advanced editing tools that can transform your videos. These tools allow for professional-grade editing right at your fingertips. Whether you are editing a feature film or a short clip, these features will elevate your work.
Multicam Editing
Multicam editing lets you edit footage from multiple cameras. This feature is perfect for events, interviews, and live performances. You can sync multiple video sources and switch between them seamlessly. The process is simple yet powerful. First, import your footage and sync the clips. Next, use the multicam viewer to switch angles in real-time. This method saves time and ensures a polished final product.
Using Fusion For Vfx
Fusion is Davinci Resolve’s visual effects tool. It offers a vast array of VFX options. With Fusion, you can create stunning visual effects and motion graphics. Start by adding a Fusion composition to your timeline. Use nodes to create complex effects. Each node represents an effect or transformation. Connect nodes to build your desired VFX. This node-based approach is intuitive and flexible.
Fusion also supports 3D compositing. You can add 3D objects, text, and particles to your videos. These features help you create visually appealing content. With practice, Fusion becomes a powerful tool in your editing arsenal.
Credit: artgrid.io
Color Grading Essentials
Color grading is a crucial step in video editing. It transforms your raw footage into something stunning. With Davinci Resolve, you can achieve professional-grade results. Let’s dive into the essentials of color grading.
Basic Color Correction
Basic color correction is the first step in color grading. It ensures your footage looks natural. Follow these simple steps:
- Open your video in Davinci Resolve.
- Navigate to the Color page.
- Use the primary color wheels to adjust shadows, midtones, and highlights.
- Balance the colors using the temperature and tint sliders.
These adjustments correct any color imbalances. They ensure your footage has a neutral look.
Using Luts And Nodes
LUTs (Look-Up Tables) and nodes are powerful tools in Davinci Resolve. They help you achieve a specific look and feel.
Using LUTs:
- Go to the Color page.
- Open the LUTs panel.
- Choose a LUT that matches your desired look.
- Drag and drop the LUT onto your footage.
LUTs can dramatically change the appearance of your video. They are pre-set color profiles.
Using Nodes:
- Navigate to the Nodes panel.
- Right-click to add a new node.
- Use different nodes for separate adjustments.
- Combine nodes to create complex color grades.
Nodes give you control over each adjustment. They allow for more precise color grading.
| Step | Action |
|---|---|
| 1 | Basic color correction |
| 2 | Apply LUTs |
| 3 | Use nodes for detailed adjustments |
With these tools, you can edit videos like a pro. Start color grading in Davinci Resolve today!
Audio Editing Tips
Editing audio is a crucial part of creating professional videos. Using DaVinci Resolve, you can make your audio sound clear and engaging. This section will cover some essential tips to get the best audio for your videos.
Syncing Audio And Video
Syncing audio and video is the first step in audio editing. Follow these steps to achieve perfect sync:
- Import your video and audio files into DaVinci Resolve.
- Select both the video and audio clips.
- Right-click and choose “Auto-Sync Audio”.
- Choose “Based on Waveform” for precise syncing.
Ensure that you check the sync by playing the clips. Adjust manually if needed.
Applying Audio Effects
Adding audio effects can enhance the quality of your sound. Here are some common effects to consider:
| Effect | Description |
|---|---|
| Equalizer (EQ) | Balances different frequencies to improve sound clarity. |
| Compressor | Reduces the volume of loud sounds and amplifies quieter sounds. |
| Reverb | Adds a sense of space and depth to the audio. |
To apply these effects in DaVinci Resolve:
- Select the audio clip in the timeline.
- Go to the “Fairlight” tab.
- Choose the desired effect from the effects library.
- Adjust the settings to fit your needs.
Experiment with different settings to find the best sound for your project. Remember, subtle changes often make the most significant difference.
Credit: www.blackmagicdesign.com
Exporting Your Project
Exporting your project is the final step in video editing. It ensures your video is ready for sharing. DaVinci Resolve offers powerful export options. Let’s explore how to export your project like a pro.
Choosing Export Settings
First, open the “Deliver” page in DaVinci Resolve. Here, you’ll find various export settings. Choose the format that suits your needs. Popular formats include MP4 and MOV. MP4 is ideal for online videos. MOV is often used for higher quality.
Next, decide on the resolution. Common options are 1080p and 4K. Higher resolutions offer better quality. But they also create larger files. Consider your audience and platform. Adjust the frame rate if needed. Match it with your project’s frame rate.
Rendering For Different Platforms
Different platforms have different requirements. YouTube prefers MP4 with H.264 codec. Set the bitrate to around 10,000 kbps for 1080p. For Facebook, lower the bitrate to about 6,000 kbps. Instagram videos should be square or vertical. Use a resolution of 1080×1080 for square videos.
Exporting for TV or cinema needs higher quality. Use the MOV format with ProRes codec. This maintains the best video quality. Ensure you check the audio settings too. Platforms like YouTube prefer AAC audio codec.
Once you’ve chosen your settings, click “Add to Render Queue.” Then click “Start Render” to export your video. DaVinci Resolve will process your project. Soon, your video will be ready to share with the world.
Frequently Asked Questions
How Do I Start Editing In Davinci Resolve?
To start editing in Davinci Resolve, import your footage into the media pool. Drag clips to the timeline, and begin making cuts and adjustments.
What Are The Best Tools In Davinci Resolve?
Davinci Resolve offers powerful tools like the Cut Page, Color Grading, Fusion, and Fairlight for professional video editing, color correction, and audio post-production.
How Can I Color Grade In Davinci Resolve?
To color grade in Davinci Resolve, switch to the Color tab. Use the primary color wheels, curves, and nodes to adjust the color and contrast.
Is Davinci Resolve Free To Use?
Yes, Davinci Resolve offers a free version with many professional features. There’s also a paid Studio version with additional advanced tools.
Conclusion
Editing videos like a pro in Davinci Resolve is simpler than you think. Practice regularly to get better. Use the tips shared in this guide. Experiment with different features and tools. Soon, you will create stunning videos. Your skills will improve with each project.
Keep learning and stay creative. Happy editing!
{ “@context”: “https://schema.org”, “@type”: “FAQPage”, “mainEntity”: [ { “@type”: “Question”, “name”: “How do I start editing in Davinci Resolve?”, “acceptedAnswer”: { “@type”: “Answer”, “text”: “To start editing in Davinci Resolve, import your footage into the media pool. Drag clips to the timeline, and begin making cuts and adjustments.” } } , { “@type”: “Question”, “name”: “What are the best tools in Davinci Resolve?”, “acceptedAnswer”: { “@type”: “Answer”, “text”: “Davinci Resolve offers powerful tools like the Cut Page, Color Grading, Fusion, and Fairlight for professional video editing, color correction, and audio post-production.” } } , { “@type”: “Question”, “name”: “How can I color grade in Davinci Resolve?”, “acceptedAnswer”: { “@type”: “Answer”, “text”: “To color grade in Davinci Resolve, switch to the Color tab. Use the primary color wheels, curves, and nodes to adjust the color and contrast.” } } , { “@type”: “Question”, “name”: “Is Davinci Resolve free to use?”, “acceptedAnswer”: { “@type”: “Answer”, “text”: “Yes, Davinci Resolve offers a free version with many professional features. There’s also a paid Studio version with additional advanced tools.” } } ] }